Edited March 2006
Underexposed originals
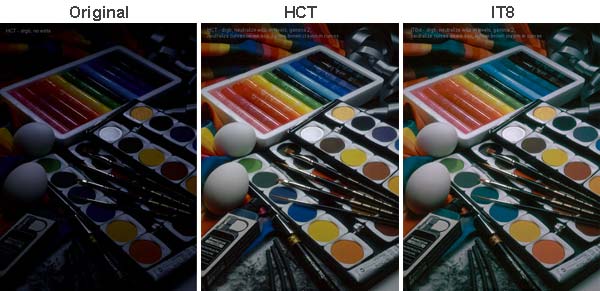
These examples show how an extremely underexposed transparency can be restored to truer color with an HCT profile than with an IT8 profile, using identical correction procedures in Photoshop. Larger versions are shown below.
NOTE: The images on this page contain embedded 'ColorMatch RGB' profiles for reasonable results in most browsers on Macintosh computers, however browser color is generally unreliable, so please download the larger versions and view them in Photoshop. Larger versions can be downloaded by clicking on the images below. These larger images have the DonRGB4 profile embedded. To view them properly, open them in Photoshop 6 and accept the embedded profile. You will need a properly-profiled monitor to see the images correctly.
Converted with an HCT profile:
Notice the good modeling and separation between colors in saturated areas that were virtually black in the original. All colors are closer to the original product. Click on the image to download a larger corrected version with the original DonRGB profile embedded.

Method:
- Open raw scanned image in Photoshop 6 & assign an HCT scanner profile.
- Convert to DonRGB working space using the Apple CMM.
- Set white and black in levels, neutralizing any cast in whitest and blackest areas.
- Neutralize middle-tone cast on ink box, inside loop, with Curves middle-tone eyedropper.
- Open shadow detail slightly with curves.
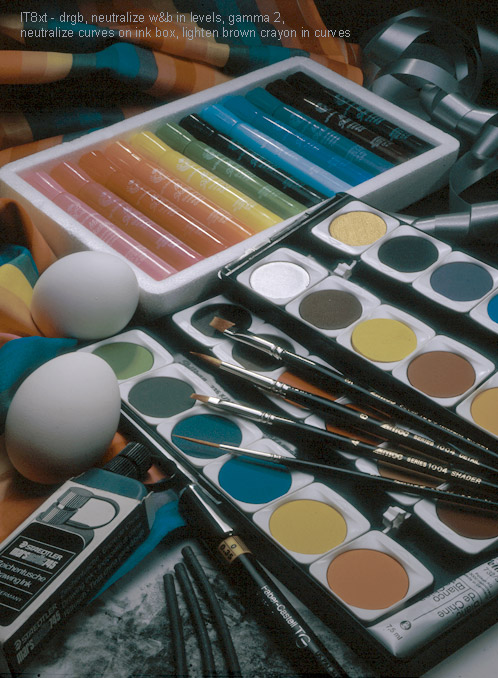
Converted with an 'extended' IT8 profile:
(To
learn about extended profiles, click here.)
This
reproduction was treated identically to the HCT example above, except
for slightly different Levels and cast removal settings, necessary to achieve
the same overall tone and gray balance. Notice
the flat modeling, especially in blues and reds, and weaker color saturation
than the HCT. Deep
royal blues have gone cyan-green and saturated reds have turned washed-out
orange. Click on the image to download a larger corrected version with the
original DonRGB profile embedded.
Method:
- Open RGB image in Photoshop and assign an 'extended' IT8 profile.
- Convert to DonRGB working space using the Apple CMM.
- Set white and black in levels, neutralizing any cast in whitest and blackest areas.
- Neutralize middle-tone cast on ink box, inside loop, with Curves middle-tone eyedropper.
- Open shadow detail slightly with same curve used in HCT example.
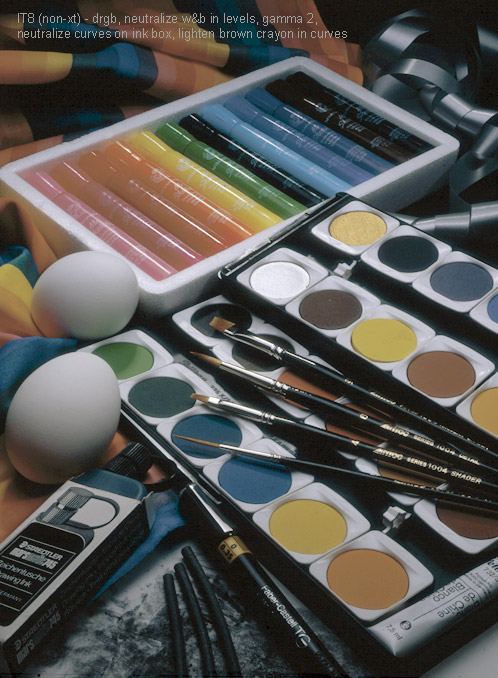
Converted with a 'normal' IT8 profile:
This reproduction was treated identically to the above two examples, except for slightly different Levels and cast removal settings, necessary to achieve the same overall tone and gray balance. Notice the even worse color modeling and even weaker color saturation than the above two examples. Click on the image to download a larger corrected version with the original DonRGB profile embedded.
Method:
- Open RGB image in Photoshop and assign a 'normal' (non-extended) IT8 profile.
- Convert to DonRGB working space using the Apple CMM.
- Set white and black in levels, neutralizing any cast in whitest and blackest areas.
- Neutralize middle-tone cast on ink box, inside loop, with Curves middle-tone eyedropper.
- Open shadow detail slightly with same curve used in HCT example.
How we did this test
A three-stops underexposed transparency was scanned just once to a raw RGB file using a standard scanner setup intended for normally-exposed originals. No special scanner adjustments were made and no highlight, shadow, contrast or gamma settings were applied on the scanner. The scanner was a Scitex Eversmart Pro flat bed scanner with typically dusty optics that created excessive optical flare - the worst scenario for showing the advantage of HCT over IT8 profiles.
Three different profiles were then assigned to three copies of the original file. One profile was made with the HCT and two were made with a recently re-measured Ektachrome IT8.7/1. One IT8 profile was made with the IT8 target 'as scanned' while the other was made using an 'extended' version of the IT8 scan, to maximize shadow detail. (To learn about extended profiles, click here.)
Having assigned the profiles, each image was then converted to DonRGB4. The left hand image in each pair are all reasonable simulations of how the original looked before correction.
Each image was then edited in Photoshop to produce a pleasing the tone curve and color balance of a normally-exposed original. Every effort was made to keep the edits identical, except for small differences necessary to ensure a similar tone response and gray balance in the corrected version. The only controls used were Levels (to set White and Black on the same image locations, and to lighten the image) and a single click with the middle eyedropper in Curves to remove the main color cast. Another single-point curve correction was used to open shadows slightly. Absolutely no local edits or color-selective controls were used.
After these corrections, the images were converted from DonRGB to ColorMatch RGB for web display. The original DonRGB4 versions can be downloaded by clicking each image.